We decided to change up our annual Halloween Display this year including adding this Jack O Lantern Arch at the entrance to our doorway.
We got some ideas from photos we had viewed online however the final result was achieved via some trial, error and on the go fixes including the use of Duct Tape.
We have had many questions on how it was done so here you go...
Try it at your own risk, expense and patience... :)
-------------------------------------------------------------------------------------------------------------------
First we purchased 30 pumpkins.
We found these at Michaels, Joanne's and Target. They are a foam type, hollow and can be carved.

We spent a couple of hours carving various scary, happy and Disneyesque faces...
Then we needed something to put them on.
We visited Lowe's Hardware store where we found 4 foot rebar and a whole lot of PVC pipe and connectors. With a idea on paper and some general measurements we began cutting... and cutting... and cutting... Oh... and measuring too... sometimes...
And here is the result and basic framework of the arch:

this arch measure 8 feet tall, 10 feet wide and includes a 45 degee angle portion on each side to compliment the arch style. We first pounded in 4 rebar's into the ground and placed the PVC pipe over them to create stability. This has worked very well so far.
We also included 6 cross bars fairly equally distributed around the arch to create stability and a uniform distance between the two main PVC pipes.
Then... we got started placing pumpkins with the biggest one on the top right in the middle.

We also chose to place the smaller sizes right next to the big guy to emphasize his stature.
These carvable pumpkins are hollow and are fairly light weight so things seemed fine soooo... we added more pumpkins to the arch:

We secured the pumpkins to the PVC pipe with a craft wire we found at Michael's. The wire is wrapped with a brown paper material so blended in well.

This is when we decided that the arch needed a little more securing.
The weight wasn't getting too bad yet however, it does get windy in the PNW and that could cause a problem. Se we purchased some small gauge wire and screw in hooks and tied the wire around various key points on the arch and five main support locations on the house, front, back and sides of the arch.
Then we added more pumpkins...
Then... we realized we didn't have nearly enough pumpkins...
Lucky for us there were sales... 50% off at Michaels and Joanne's. Whew...
We were having some issues with getting the pumpkins to sit just right on the arch so I added this 2 inch x 1/2 inch x 8 foot board on the top to help support the pumpkins.

Once the arch was full of pumpkins, two rows and two wide. 70 pumpkins in all... we then moved on to stringing and placing the lights in the jack o lanterns.

Be sure to use lights that are for outdoor use.
Then we needed to hide the PVC pipe... We painted some of it black and in retrospect, I recommend painting it all brown or black before you set it up.
We then found fall leafy vines at Michael's and Joanne's for 60% and 80% off and filled in the gaps!!

Here is what the PVC arch corners and the cross members look like:


After much duct tape, stringing of lights and outdoor power strips, vines and touch ups...
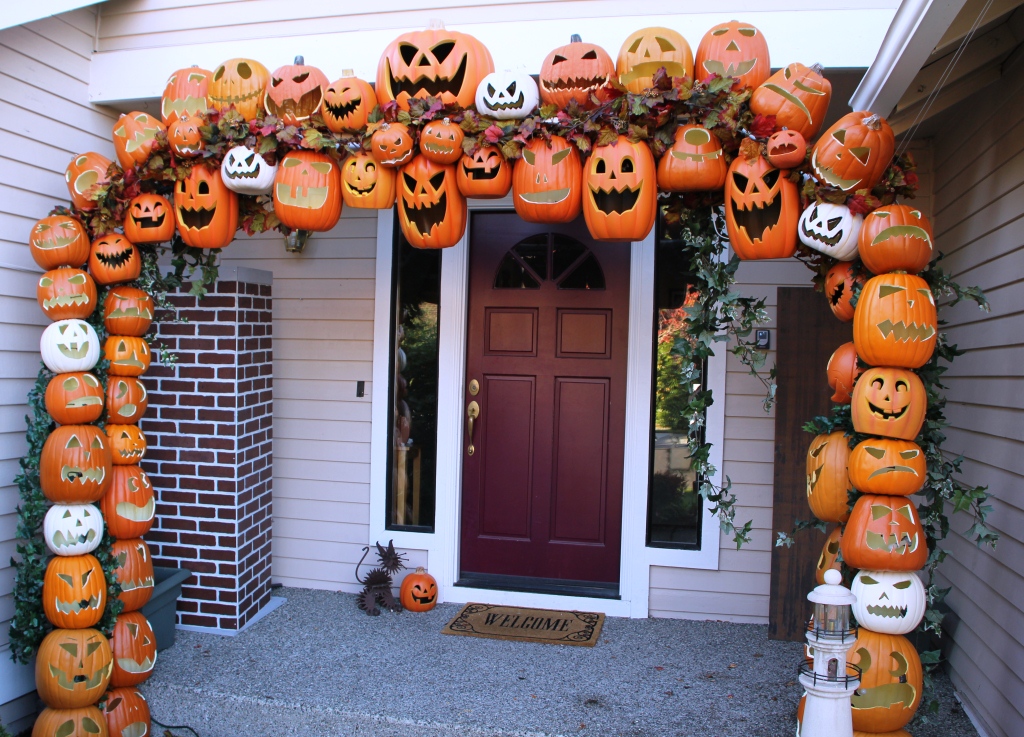
Here is the finished product:
After nearly 2 full days of work, numerous trips to Hardware and Crafts stores and several more hours of set up and carving... we are very pleased with the final product. Now we just hope it holds together when the wind and rains comes...
And now ladies and gentlemen...
Here is the arch lit up at night:

If you choose to give this a try... plan for more time than you think and many more pumpkins that you think...
Good luck and Happy Halloween!!