We decided to change up our annual Halloween Display this year including adding this Jack O Lantern Arch at the entrance to our doorway.
We got some ideas from photos we had viewed online however the final result was achieved via some trial, error and on the go fixes including the use of Duct Tape.
We have had many questions on how it was done so here you go...
Try it at your own risk, expense and patience... :)
-------------------------------------------------------------------------------------------------------------------
First we purchased 30 pumpkins.
We found these at Michaels, Joanne's and Target. They are a foam type, hollow and can be carved.

We spent a couple of hours carving various scary, happy and Disneyesque faces...
Then we needed something to put them on.
We visited Lowe's Hardware store where we found 4 foot rebar and a whole lot of PVC pipe and connectors. With a idea on paper and some general measurements we began cutting... and cutting... and cutting... Oh... and measuring too... sometimes...
And here is the result and basic framework of the arch:

this arch measure 8 feet tall, 10 feet wide and includes a 45 degee angle portion on each side to compliment the arch style. We first pounded in 4 rebar's into the ground and placed the PVC pipe over them to create stability. This has worked very well so far.
We also included 6 cross bars fairly equally distributed around the arch to create stability and a uniform distance between the two main PVC pipes.
Then... we got started placing pumpkins with the biggest one on the top right in the middle.

We also chose to place the smaller sizes right next to the big guy to emphasize his stature.
These carvable pumpkins are hollow and are fairly light weight so things seemed fine soooo... we added more pumpkins to the arch:

We secured the pumpkins to the PVC pipe with a craft wire we found at Michael's. The wire is wrapped with a brown paper material so blended in well.

This is when we decided that the arch needed a little more securing.
The weight wasn't getting too bad yet however, it does get windy in the PNW and that could cause a problem. Se we purchased some small gauge wire and screw in hooks and tied the wire around various key points on the arch and five main support locations on the house, front, back and sides of the arch.
Then we added more pumpkins...
Then... we realized we didn't have nearly enough pumpkins...
Lucky for us there were sales... 50% off at Michaels and Joanne's. Whew...
We were having some issues with getting the pumpkins to sit just right on the arch so I added this 2 inch x 1/2 inch x 8 foot board on the top to help support the pumpkins.

Once the arch was full of pumpkins, two rows and two wide. 70 pumpkins in all... we then moved on to stringing and placing the lights in the jack o lanterns.

Be sure to use lights that are for outdoor use.
Then we needed to hide the PVC pipe... We painted some of it black and in retrospect, I recommend painting it all brown or black before you set it up.
We then found fall leafy vines at Michael's and Joanne's for 60% and 80% off and filled in the gaps!!

Here is what the PVC arch corners and the cross members look like:


After much duct tape, stringing of lights and outdoor power strips, vines and touch ups...
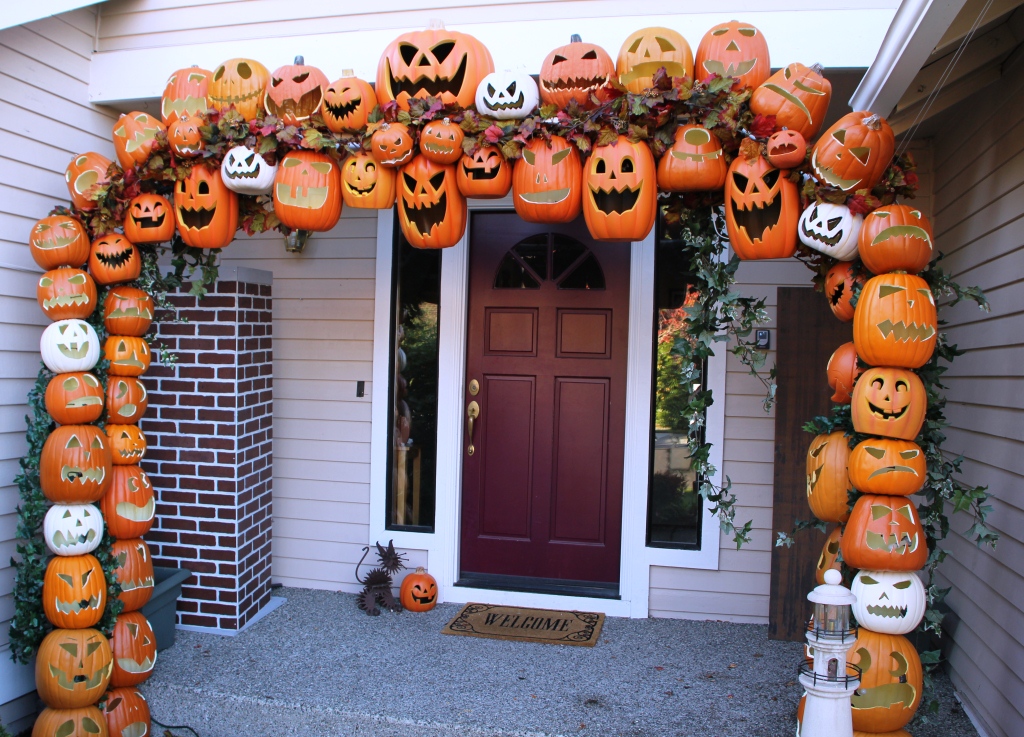
Here is the finished product:
After nearly 2 full days of work, numerous trips to Hardware and Crafts stores and several more hours of set up and carving... we are very pleased with the final product. Now we just hope it holds together when the wind and rains comes...
And now ladies and gentlemen...
Here is the arch lit up at night:

If you choose to give this a try... plan for more time than you think and many more pumpkins that you think...
Good luck and Happy Halloween!!
oh my i must make one of my own!! i have a question tho! what type of light strands did you use for this? they must be at least C-9's? and they seem widely spaced as compared to a regular light strand? did you uses several strands for each pumpkin or wire these specially? any instructions on the wiring and lighting would be great thanks!
ReplyDeleteYes. C-9 Bulbs. I used shorter length strings of 6 to 8 bulbs each. Light strings are similar to ones used for Department 56 displays. I placed several outlet strips along the arch. If there were bulbs inbetween pumpkins I was not able to use I removed or blacked out. Will be making again this year and plussing it up for even more!
ReplyDeleteWhere can you find these pumpkins in bulk? Where did you get yours?
DeleteMichael's or other craft store
DeleteI find them all the time at garage sales! Usually arepriced from .50 - $2.00
DeleteThis is beautiful! I found it via Pinterest. I was wondering if you use have to pierce the pumpkins in order to hang them with that little brown-wrapped wire, or do you just use it to secure the light cords to the PVC pipe?
ReplyDeleteHi Trick! Yes, need to poke holes in the pumpkins for the ties to ensure they stay in place. This ensures that each pumpkin is set and they don't move around... Especially in the wind...
DeleteForgot to hit the button that notifies me of follow-up comments, so I'll ask another: how are you storing 70 pumpkins?
ReplyDeleteHoliday storage unit... Doesn't EVERYONE have this?? ;)
DeleteThat's just awesome. I need that! We are hosting our first Halloween Party. I want it to be scary and grand, just like our costumes will be. We have to use your idea. Thank you! I will post photos.
DeleteThis is sooooo awesome! Forgive me for asking but how much did this project cost?
ReplyDeleteThanks Tera. It has been built up over a few years... We now have over 150 Jack O Lanterns on this project.
DeleteI wanted to ask you if you've dealt with rain yet and if the pumpkins filled with water or not. Also did you put a film over the openings in order to diffuse the light or can you see the bulbs through the openings. I've had several friends tell me I should make this but our archway is twice as big and honestly I don't think I have the energy! :) Oh and yes I to have a holiday storage unit!
ReplyDeleteKie, it rains alot here near Seattle during October. They used to fill with water a bit however I now have holes drilled in the bottom of each to allow for drainage. I place the bulbs in a manner that is low or high inside the pumpkin so you usually cannot see the light... I also use Orange lights and some that flicker... It is alot of work but it is so worth it!
DeleteThanks for sharing your DIY! It is so beautiful! I want to do something like this myself. :)
ReplyDeleteValarie Lemons
This is awesome ! Where can I buy the light strings for the pumpkins ? Thanks
ReplyDeleteI use regular Christmas light strings with C7 bulbs.., all orange.
DeleteWOW...you guys don't mess about...excellent!
ReplyDeleteWe'd like to share this over at ours and I'll get the link to you when its live.
Thanks Jamie
Here you go! http://www.renocompare.com/2015/09/xx-of-the-best-diy-halloween-decoration-ideas/
DeleteThanks so much!
Thank you for considering us!
DeleteWow!!! Love it
ReplyDeleteThanks Patti! Wait until you see this year's!!
DeleteHave you posted this year's yet?? So awesome!!! Great job!!!!!
DeleteWow!!! Love it
ReplyDeleteThis is fabulous! I'm attempting this next year- just got a boatload of pumpkins in a discount grab bag at Michael's. So now I get to think about it all winter!! I would love to see this year's pumpkins!!
ReplyDeleteMan, this is amazing. It's usually my husband who goes crazy for Halloween decorating, and we won't have enough time to do it this year, but I don't think I'll have a problem convincing him for next year! Fantastic idea, and thank you so much for sharing!!
ReplyDeleteMan, this is amazing. It's usually my husband who goes crazy for Halloween decorating, and we won't have enough time to do it this year, but I don't think I'll have a problem convincing him for next year! Fantastic idea, and thank you so much for sharing!!
ReplyDeleteMichaels and/or JoAnns should be paying you! They will make a killing in pumpkin sales after people see this!
ReplyDeleteI have checked numerous craft store websites, and I cannot find these foam pumpkins listed anywhere! Anyone have any luck in the hunt? :) 8/19/2016
ReplyDeleteWe got them at Michaels stores and carved them ourselves.
DeleteI'm in the process of building now I bought my first wave of 20 pumpkins from Michaels and Joann Fabric. Even on sale Id say I've spent 150 with 50 more to buy ! But it will be worth it!
ReplyDeleteThis comment has been removed by the author.
ReplyDeleteHi there, I am also in the process of making this arch, but I have a question about the pumpkins on the sides. How do you attach them to keep them from sliding down the pipe, or are they sitting/resting on the ones right below them?
ReplyDeleteThey are resting one on top of the other and then they are also tied to the frame to keep them in place
DeleteOk thank you very much! I love your archway, mine will only be about half that size because I have a narrower entry way, but I'm very excited as I see it start to take shape. Thanks so much for your ingenuity!!
DeleteMaybe 1/2 way done my arch. Thanks for the inspiration. Will update when I'm done. It does take a lot longer than I imagined.
ReplyDeleteFantastic! Looking forward to the photos!
DeleteSo in all , how much did u spend for this project and is it easy to take down ?
ReplyDeleteLikely in the hundreds of dollars. $10 to $20 per pumpkin, 125 total. $100 in vines. $50 in pvc pipe and connectors. Expanded the number of pumpkins over several years.
DeleteI love this I decorate a lot for Halloween going to have to try and convince my husband to make one of these with me
ReplyDeleteIt is even more awesome in person. Photos only show so much
DeleteCame across this on pinterest. This is AMAZING!! I might have to take a trip to the craft store and hardware store this weekend.
ReplyDeleteHave fun!
DeleteI have a Halloween party every year, people usually come in through the back yard so I thought about putting the archway across the drive way. Do you think it would be too unstable without a porch or house to support it? Also what time of year did you find the pumpkins on discount? I wanna make sure I hit the sales! Thank you!
ReplyDeleteMaking across the driveway is a long ways. The pvc pipes will sag with weight. I would suggest moving to a wood frame that will be strong enough to hold up.
DeleteAlso, the porch and house do not support the display at all. It is free standing except for a couple of wires for stability in PNW winds.
DeleteThank you!
DeleteWhat size pvc did you use?
ReplyDelete1 Inch. Depends on how big you choose to make the entire arch. go to home depot and feel how stiff or flexible each size is to get an idea of what you are working with.
DeleteAll done! Finally. How do I post photos?
ReplyDeleteThanks again for the inspiration.
Don - Thanks for being the inspiration for our own pumpkin arch - one question for you. Your photos show a C7 light strand, but I noticed most of your pumpkins have the "clamps" to mount the bulb in place in the hole - did you purchase these separately or buy a C7 strand with the clamps in place? My existing pumpkins don't have clamps that can be removed.
ReplyDeleteThe clamps were on the light string. there were none on the pumpkins. After I put the light inside the back of the pumpkin I also covered it with a piece of duct tape just to be sure it didn't pop out. Being in the Pacific Northwest I had to take extra measure against rain and wind.
DeleteDid you use a dremel to make quick work of carving?
ReplyDeleteI used plain old sharp cutting knives on the foam pumpkins.
DeleteSuper impressive! I have featured it in our article, 10 Spooky DIY Halloween Door Decorations. You can check it out here if you like, https://www.diythought.com/10-spooky-diy-halloween-door-decorations/ thanks
ReplyDeletethat is so nice of you! thank you so much for enjoying my work.
DeleteHI Don,
ReplyDeleteI am recreating this for my wedding. Could we speak through email?
I’ve been planning to make this for years and now that COVID has hit I have plenty of time on my hands and finally enough pumpkins to do it! My question is what did you use to tie the pumpkins? I still can’t figure that out. I’m in eastern WA, so the wind over here is bad. Just want to make sure whatever I use doesn’t “rip” through the pumpkins. FYI - for anyone reading, I used an exacto knife, and made stencils out of card stock. Once you do a couple it gets easier and easier. Once I received a shipment of 20 pumpkins from Target and stayed up until 3 in the morning - it just was just so fun. Thanks so much.
ReplyDeleteHello and thank you for the note! That is exciting you are creating your own!
DeleteI used a thick wire to secure the pumpkins to the arch. I poked 2 holes into the back or bottom of the pumpkin, strung the wire through and then tied it to the pvc pipe frame.
You can find the wire at Michaels:
www.michaels.com/ashland-naturally-coiled-wire/10336518.html
I hope it all works out for you!!
Amazing! You are like the Santa of Halloween! I can't imagine all the time and effort in creating this. Wish I could trick or treat at your house.
ReplyDeleteThank you so much for the instruction, and the humor. I am a professional pumpkin carver and have started this last year with home shows for my community. I have been looking for something like this as an entrance and to draw attention. It's absolutely perfect! Thanks again for sharing and God Bless!
ReplyDeleteWould you be able to show a picture or explain where the supporting wires are attached on the arch at each point that attach to the house? I'm confused how to add wire to the pvc and attach it to my house for wind stability. Do I drill a hook or something to the house and attach the wire to them? Thanks?
ReplyDeleteHello Maria. I used hooks that i screwed in under the gutters. connected wire to the set piece and then to the hooks.
DeleteThank you!
DeleteHow do you attach the pvc pipes together? Is there an adhesive that you use?
ReplyDeleteHello. No adhesive as I wanted to take it apart and store it each year... there are couplings that each of the tubes fit into and tighten. Zoom in on a pic and you should see them... at the hardware store they will have them in different shapes and sizes. I hope that helps.
DeleteHow did you blackout the lights in between pumpkins? I’m not sure if I should use electric tape, glass paint, or neither!
ReplyDeleteHello. I used back spray paint and sometimes electrical tape...
DeleteAwesome! Too late for this year but a fun project to work on for 2022! Thanks for all of the info!
ReplyDeleteSo how did you create The Base did u just burrie the PVC or make a base how did u anchor.
ReplyDeleteYour pumpkin display is absolutely gorgeous but takes way too much time. I'd rather string up some lights.
ReplyDelete